
Editing and exporting audio in Audacity
Now that you have recorded some audio for your podcast, let’s do some basic editing and export our first recording.
If you have any questions or get stuck as you work through this in-class exercise, please ask the instructor for assistance.
Take your time and have fun 😀
For these exercises, please either use the audio you recorded in Activity #1 - Podcast Recording with Audacity, or download this sample podcast interview file, and then proceed.
We will start by getting used to Audacity’s editing features by trimming the first few seconds of your audio track. We are doing this so that there isn’t an uncomfortable pause at the beginning of your track.
Then, we will trim the end of the track in the same way.
Finally, we will export our first audio file, to get used to the process.
Trimming the track start and end
Nearly all recordings will have some preamble and closing sounds to remove. For example, the time between hitting the record button and beginning your introduction, you might have a light cough. Or, you might take a pause at the end of an interview to ensure that you don’t cut things off too soon.
Here are the steps to removing the unwanted sounds from the beginning and end of your track:
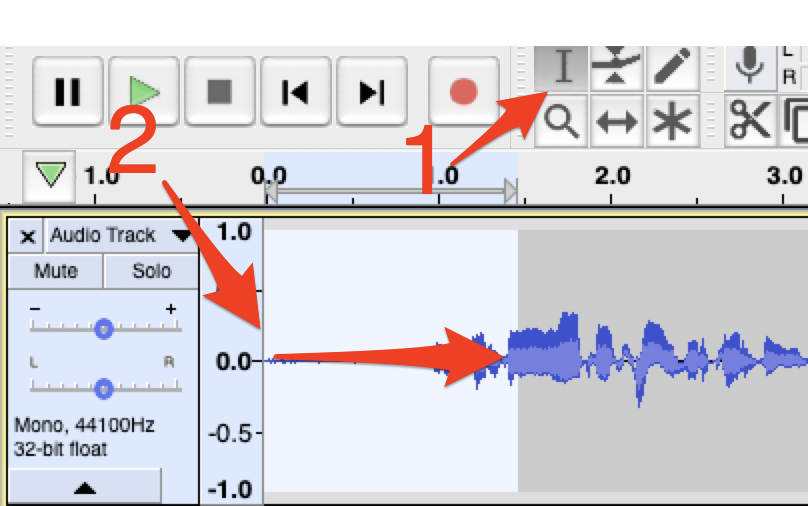
- In Audacity, look in the main menu bar and click on the Selection Tool icon.
- In the Audio Track, hover your cursor over the very beginning of the audio track (to the farthest left, near the left “0.0” mark), then click, hold, and drag to highlight the part of the track you want to remove. Whatever you have selected will turn the background lighter in colour.
- On your keyboard, press the Delete button to remove the audio you selected.
-
Follow the same process at the end of your audio track by selecting the audio you don’t want and pressing the Delete button on your keyboard.

As you did for trimming the beginning and end of the track, you can select audio from anywhere middle of your audio track, and then press the Delete button on your keyboard.
Inserting or copying audio into your audio track
This is helpful in situations where you might want to move the order of your content around. For example, in an interview recording, you might want to change the order of a question and answer.
Here are the steps to inserting or copy audio into your audio track:
- Select a few seconds of audio from the middle of your recorded audio, then, in the main menu, select Edit > Copy.
- Somewhere else in your audio track, where there is a gap in speaking, click on the timeline and then select Edit > Paste to insert the copied clip.
You can follow this same copy/paste process to move any audio from any Audacity track to another.
NOTE: the locations of buttons in Audacity’s interface vary from version to version and system to system (i.e., Windows, Mac, or Linux). If you do not find what you are looking for, rely on the main menu to Edit > Copy / Edit > Paste.

Adding fades
We add fades (moving from quiet to loud, or loud to quiet) to address abrupt starts and stops in your audio track, which can sound jarring.
Fading in and out of a track also signals to your listener that your track is about to start or end, respectively.
Here are the steps to add fades to your audio track:
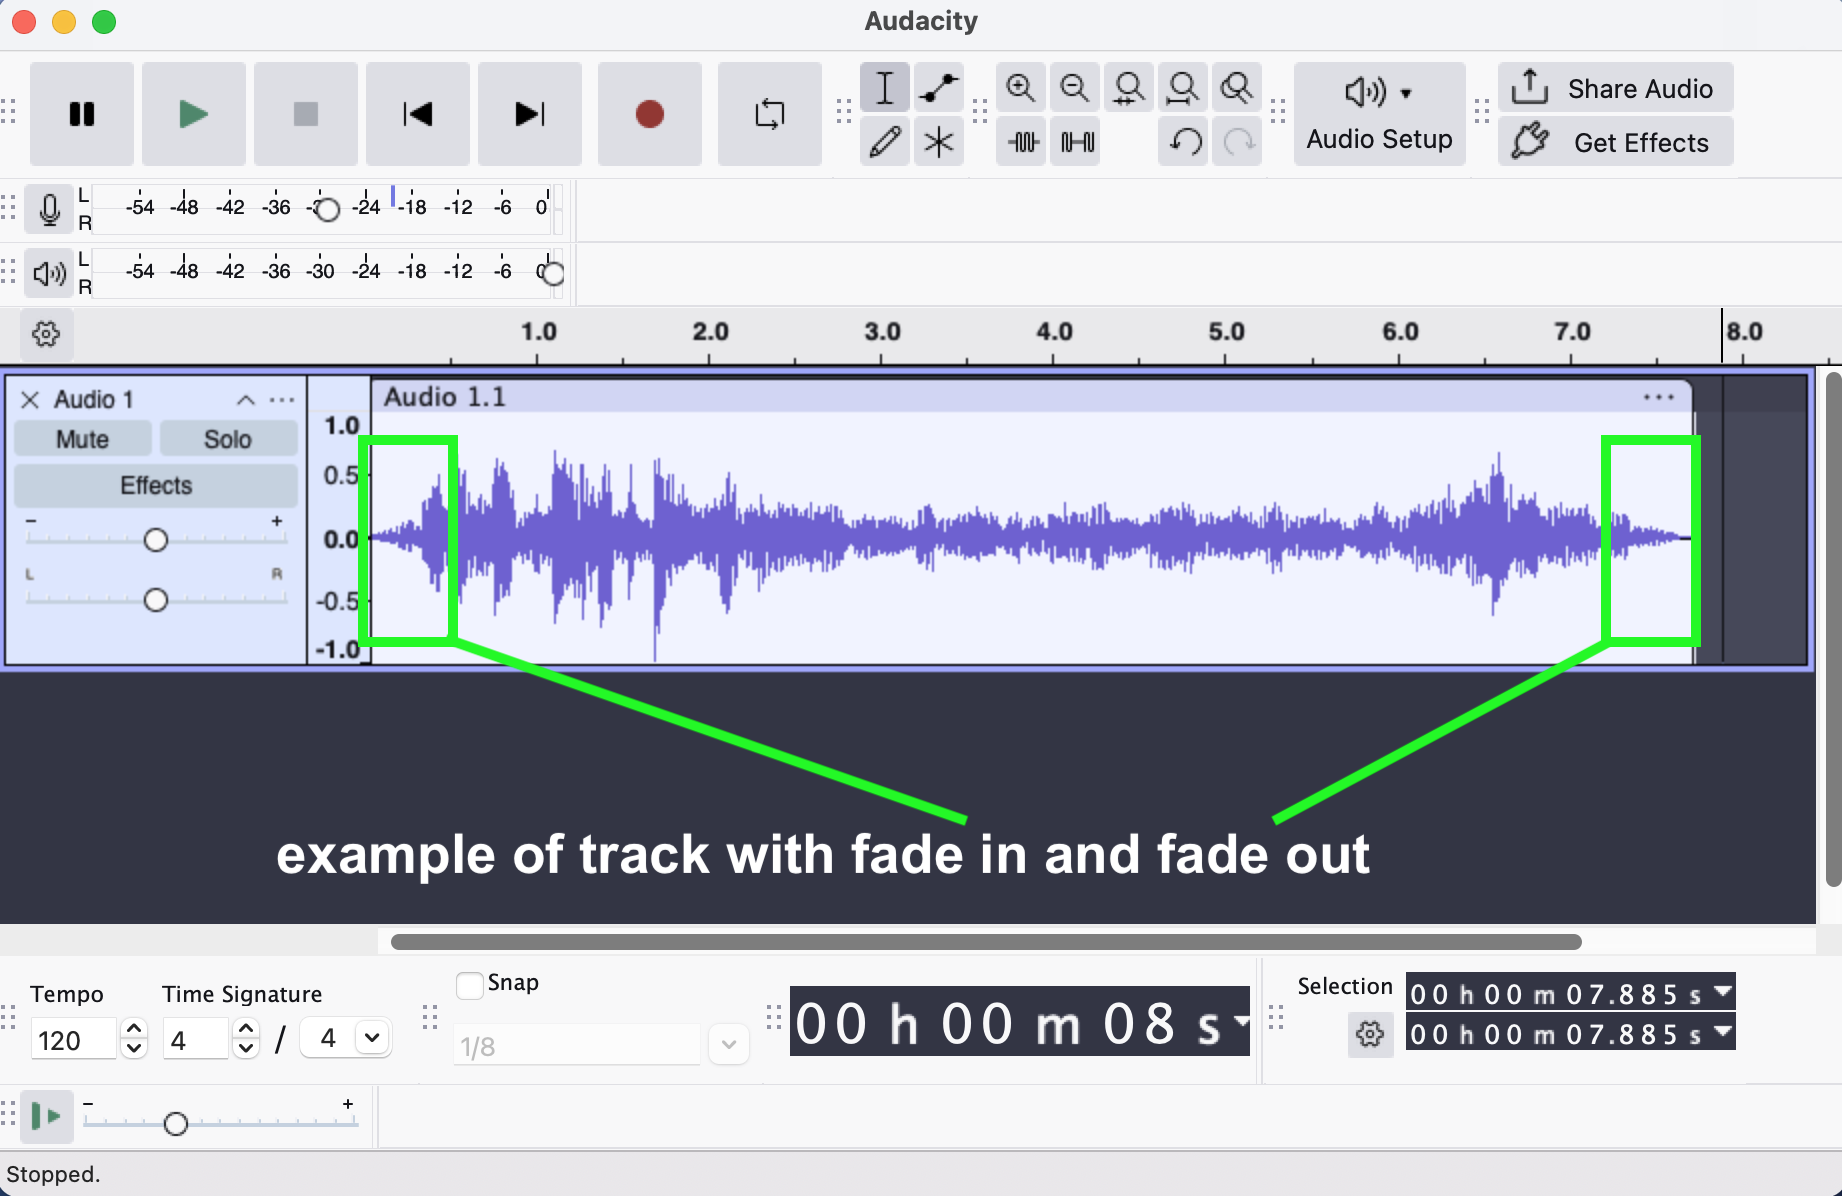
- Fade the beginning of your audio by selecting the first 3 or 4 seconds audio (on the far left of the track), and then on the top menu select Effect > Fade In.
- Fade the end of your audio track by selecting the last 3 or 4 seconds of audio (on the far right of the track) and then on the top menu select Effect > Fade Out.
You can also apply these fade techniques to any part of an Audacity track, including music, which we will learn about later.

Exporting your audio in High MP3 quality
We still have more to do for a finished product, like adding music “bumpers” (transition or break music), or voiceovers.
Before we begin, note that “saving” your file is different than “exporting” an audio track—in this case our audio track is our podcast.
In Audacity, selecting File > Save will save the Audacity project, which has a “.aup” file extension. On the other hand, “exporting” your file combines, or mixes, everything in your Audacity tracks down into one audio file. This file can then be played on an audio player or audio software, like any other digital audio file.
To get used to the export process, let’s practice adding metadata (track information) and then exporting an MP3 file.
NOTE that Audacity can export a variety of file types. We are working with MP3 files because they are a common file format, meaning that they can be played by nearly all music players and music software.
As a file type, MP3 provides a good balance of sound quality and small file size.
Here are the steps for exporting your audio track:
TIP: the latest version of Audacity (version 3.0 and up) will allow you to export MP3 files by default. However, if for some reason you are not able to update to the latest version of Audacity, or you are using particular versions of Linux, you may need to install something called the “LAME MP3 Encoder.” See these instructions for details: Installing LAME.
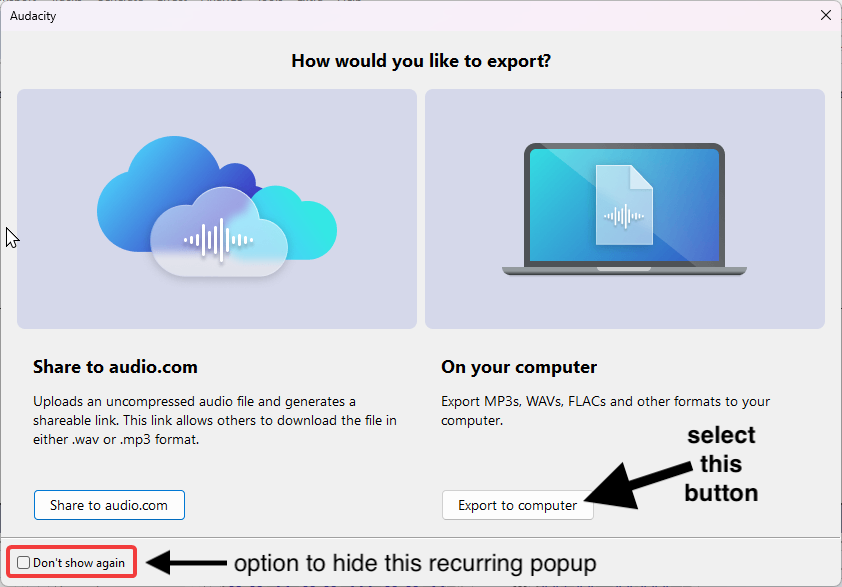
- In Audacity’s main/top menu, select File > Export Audio.
NOTE that the first time you do this, you might see a popup that allows you to choose from two options: “Share to audio.com” and “Export to computer.” Choose the “Export to computer option.” You can also disable this recurring popup by selecting the “Don’t show again” checkbox to the bottom-left of the popup.
-
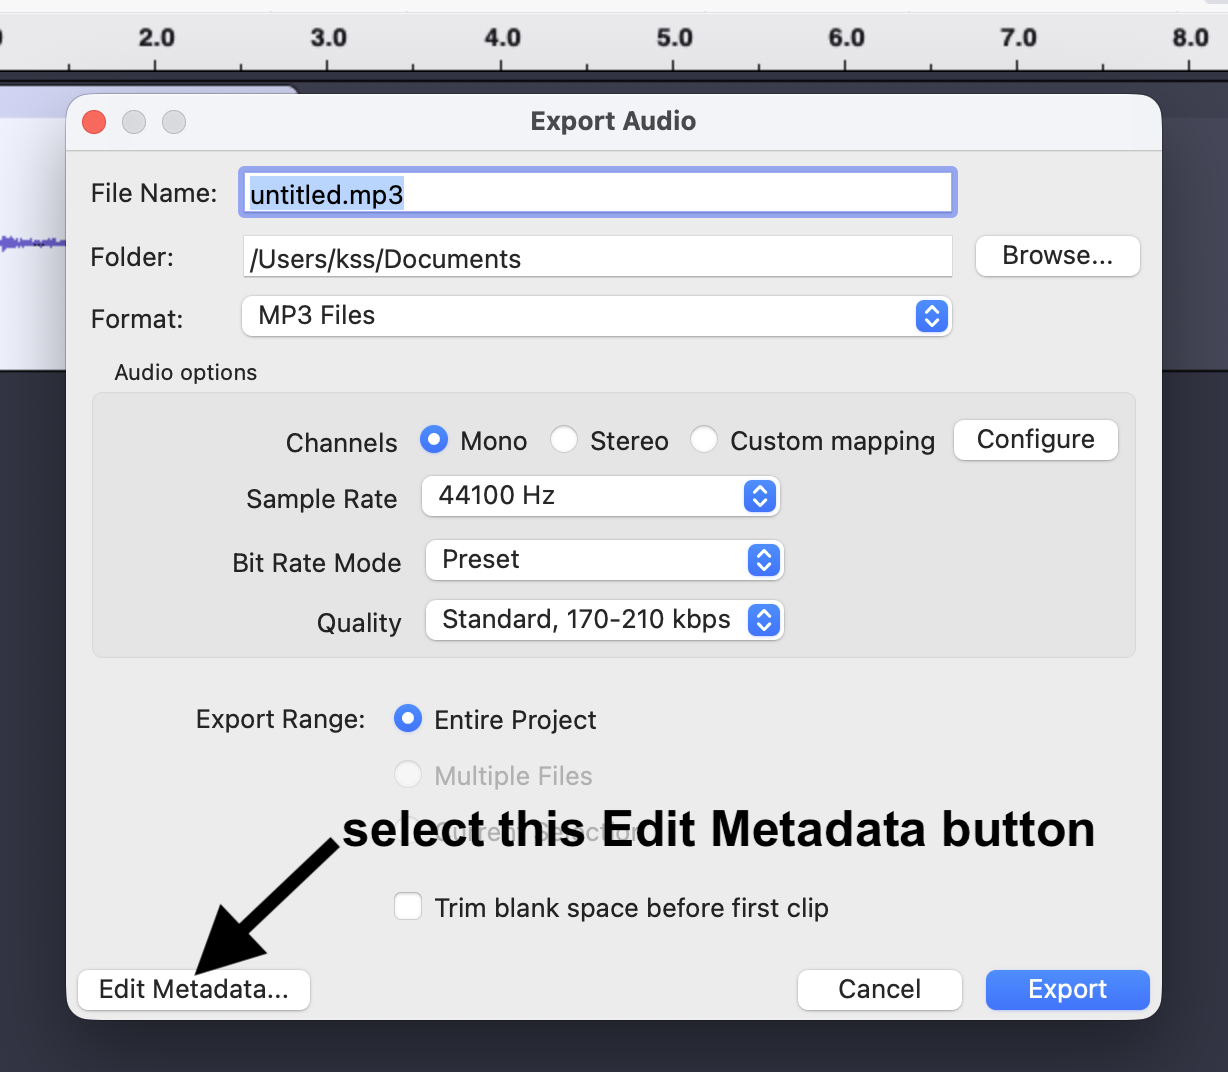
In Audacity’s “Export Audio” popup click on the “Edit Metadata” button.
-
Enter your metadata information into Audacity’s metadata (track information) popup and click on the OK button. Add as much or as little information as you like. We recommend adding at least the “Track Title” information.
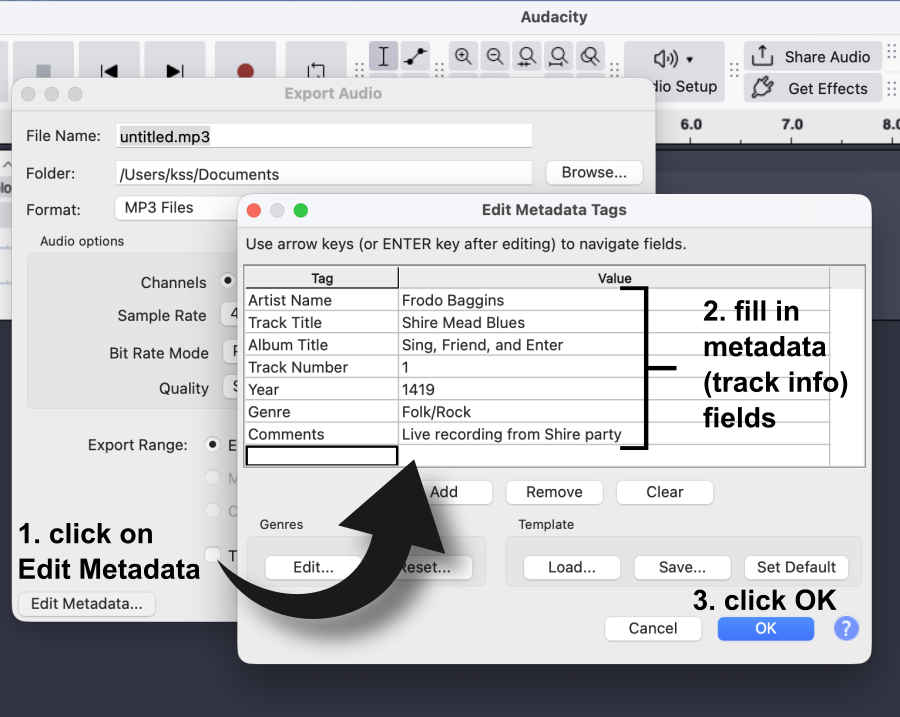
The information you put in these metadata fields will appear as track information in audio players and audio player software. For example, if you connect your phone to your car’s audio system, you will see some or all of your track’s information in your car’s audio display, depending on your car’s stereo features, of course.
Typically, modern digital audio software, like Spotify, YouTube Music, or VLC Media Player, etc., will display at least the following track information: Artist Name, Track Title, Album Title, Track Number, and Year.
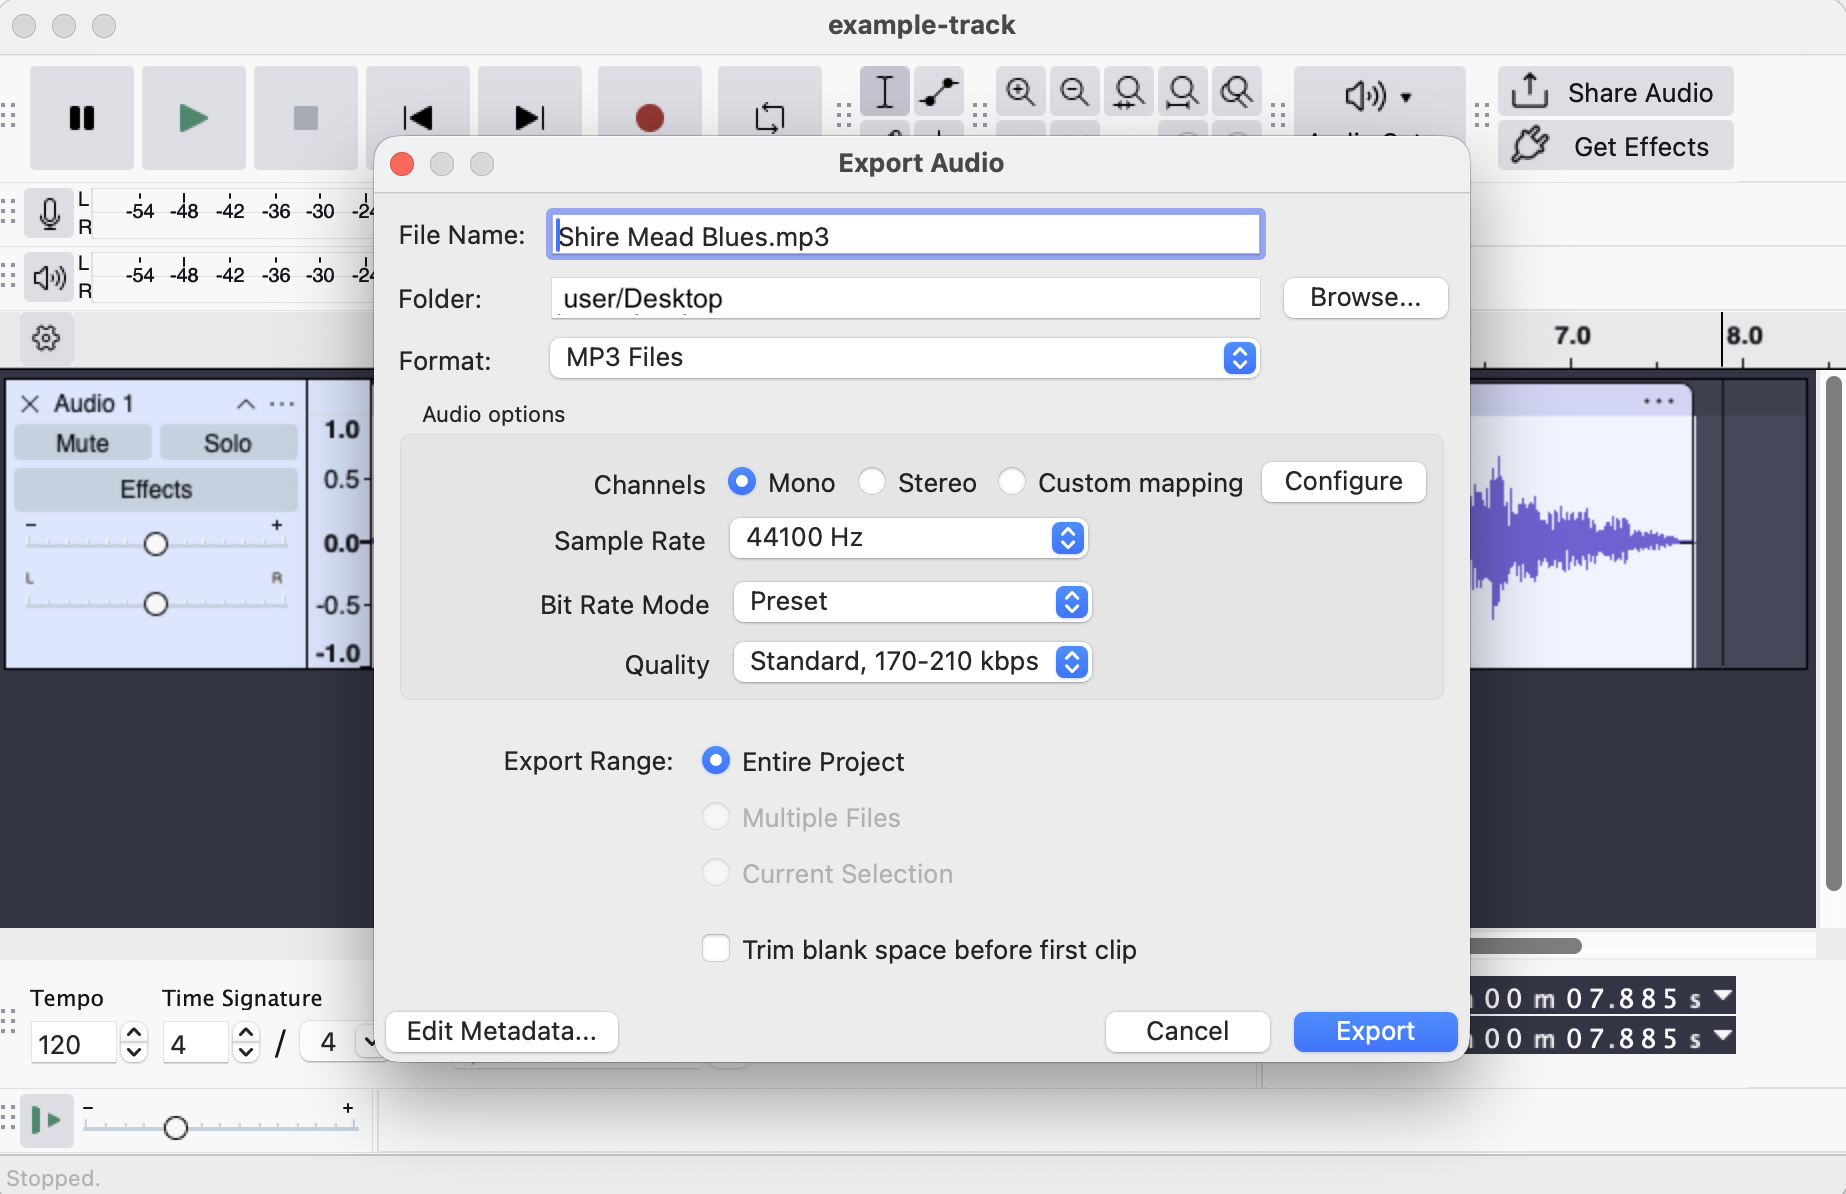
- Add a file name and select track export settings. Let’s take a moment to discuss each of the options from the top down in the Export Audio window:
- File Name: choose as simple a name as possible. Note that the “.mp3” file extension, or suffix, will be automatically applied.
- Folder: this is where on your computer that your exported file will be save. Use the “Browse…” button as needed to change the file-save location.
- Format: the default should be “MP3 Files.” If not, then select “MP3 FIles” from the menu.
- Audio options: in the “Channels” options, be sure that “Mono” is selected. Leave all the other settings alone.
- Export Range: be sure that “Entire Project” is selected. Leave the “Trim blank space before first clip” de-selected.
You will have a different file name and file path, but here is an image of the settings you should see in the “Export Audio” window before you export your file:
- Click on the “Export” button. Once your file is exported, you can listen to it in whatever audio program you have installed on your computer.
Congratulations 🎉! You have now created your first podcast file.
Anything we do from here will add extra polish to your podcast. You already know the core skills of how to trim, fade, and export your audio file.
When you are ready, move on to the final part of the basics for podcast creation: adding music…