
Green Screen
In this exercise, you will create and edit a movie in OpenShot Video Editor, including using green screen video and importing audio to overlay your clip. If you have any questions or get stuck as you work through this, please ask your instructor for assistance. Have fun!
- If you don’t have a green screen video that you want to edit, let’s start by downloading the audio and video files below and save them to your desktop:
- Green screen chickens
- Background tropical fish
- Audio - ocean waves mp3
Note: If the video starts playing in your browser you will have to right mouse click on the video and select “Save Video As…” & save to your Desktop.
- Open OpenShot Video Editor by clicking on the OpenShot Video Editor.
- If the Project Files are not visible on the left side or your screen, Control/Right click on New Project icon, then select Project Files from the pop-up menu.

- Next click on the “+” button at the top of the OpenShot Video Editor screen.
- Click on the Desktop on the left navigation pane and then hold down the Shift key and select the chickens.mp4 file, tropical-fish.mp4 file, and the ocean-waves.mp3 file.
- Finally, click on the file and select Open on the bottom right of the dialog box.

- Add the video clips and audio clip to the timeline (see pic below for example):
- Drag the chickens.mp4 video to the top timeline on your screen.
- Drag the tropical-fish.mp4 video clip to the timeline below the chickens green screen video (see gif below).
- Lastly, drag the ocean-waves.mp3 audio to the bottom timeline.

- Let’s make the green screen magic happen!
- First, select the green screen clip in the timeline with the chicken.
- Next, right-click on the New Project icon, and then if not already selected, click on Effects so that it has a checkmark beside it.
- Select the Effects tab on the left middle of your screen.
- Do a filter search by typing in Chroma Key in the effects search bar
- Next, drag and drop the Chroma Key effect on to the chicken.mp4 green screen video clip.
- Right-mouse click the green “C” icon in the green screen clip section and then select Properties

- Double click on the Key Colour property
- Where it says HTML enter the following #5DB435 (note if you use your own green screen video you will have to know the HTML or you can select Pick Screen Colour and move your mouse to click on the green screen (background) if you are using a Windows or Linux (does not work on Mac, therefore have to use HTML code))
- Next move your clip reader cursor to the start of the clip (time: 0), then modify the Fuzz property by double-clicking the value box to change it.
- Write “112” as the “Fuzz” value (see gif below).
- Your chickens should now be standing on the coral under the ocean now when you preview the video!

- Trim and modify audio levels in video and audio clips:
- Let’s trim the audio clip by selecting the audio clip and then grabbing the edge on the right of the clip and dragging it to be even with the video clips.
- There is no audio in the green screen video clip, so we don’t have to worry about it.
- There is audio in the tropical fish video, so we will remove that audio by right-clicking the tropical fish video clip and selecting Volume and then Entire Clip. Finally, to remove the audio set audio level 0%.
- If you want to make the background ocean waves audio louder or softer, simply select the audio track, and then repeat step 6c according to the volume percentage level you want. 20% sounds pretty good.
- You could also fade in the audio clip the same way you fade video clips.

 Let’s add a title to the video by selecting the Titles tab in the ribbon of your computer screen (or by clicking Command + T on a Mac, or ctrl + T on Windows), and saving the title to your project files.
 - Select all 3 media clips and drag them to the right to make room for your title.
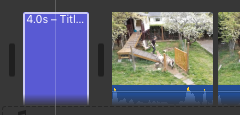
- Drag and drop your new title to the left of your media clips.
- Select your media clips and move them so they align with your title.

-
Now add credits for your video by dragging and dropping a credit style “title” from under the Titles tab to the end of the video. Edit this same way you edited the title in step #7.
- Once you’re happy with your edited video you’ll need to export it in order to upload it to YouTube, or share it via Google Photos or some other sharing service:
- Press the Save button in the very top left (third icon from the left) of the OpenShot Video Editor window.
- Give your movie a descriptive name. Select the folder where you want to put your video and press the Save button.
- Once the video is saved you can select the Export button
- It will take a few minutes for OpenShot Video Editor to export your video.
- Congratulations, you’ve created and edited a more advanced video in OpenShot Video Editor! Your video should look something like this