
RStudio Integration
RStudio with GitHub version control integration allows us to track the development of a project over time, revert to previous versions, and to collaborate with others. If you have any questions or get stuck as you work through this exercise, please ask the instructor for assistance.
- If you haven’t already, go to http://github.com and create an account for yourself.
- If you haven’t already, install GitHub Desktop on your laptop.
- If you haven’t already, install the free version of RStudio on your laptop.
- Configure RStudio to use GitHub:
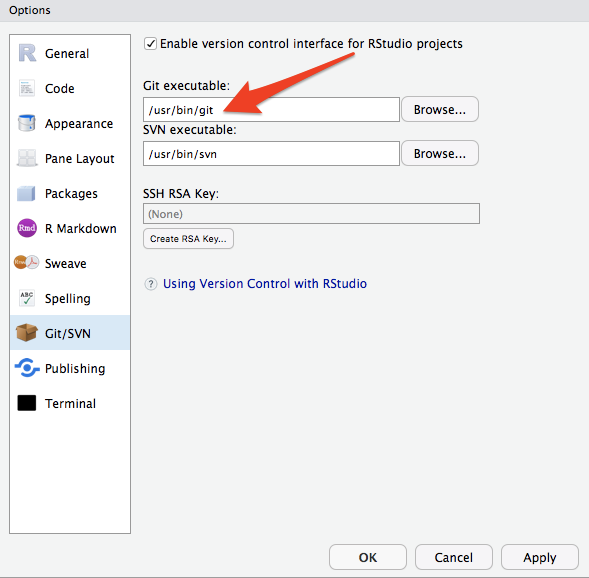
- Go to the top menu and select Tools then Global Options then GIT/SVN.
- On a Mac laptop the Git executable path should be:
/usr/bin/git - On Windows, you’ll need to click on the Browse button beside the “Git executable” field, and then browse to the Git executable file, which on my windows computer is buried deep in the file system (your path will be similar, but will not include “<username>” for example):
C:\Users\<username>\AppData\Local\GitHubDesktop\app-<#.#.#>\resources\app\git\cmd\git.exe - Note: If you have a windows laptop and are having problems finding the Git executable, please ask the person leading this workshop for help.
- Create a new project in RStudio:
- Select the File menu, New Project…, and then the Existing Directory button.

- Click the Browse… button & select or create the directory for your project (e.g. ~/Documents/r-git ).
- Press the Create Project button.
- Select the Tools menu, Project Options…, and then select the Git/SVN button.
- Click on the Version control system drop down and select Git, and the press the OK button.
- A dialog box may appear asking “do you want to initialize a new git repository for this project”. Click Yes.
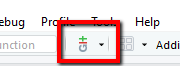
- You should now see a new little “Git” icon on the top of your RStudio tool bar that looks like this (see right):
- Note: If you don’t see the little Git icon, ask the person leading the workshop for assistance.
- Create a new file for your new RStudio/Git repository & Commit:
- Select the File menu, New File, and then Text File.
- Add some text to your document (e.g. “It is so a planet!”)
- Save the file: File menu, and then Save. Name the file “pluto.txt” and press the Save button.
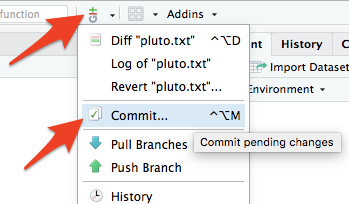
- Press the Git icon in the top menu of RStudio, and then press the Commit… button.
- A large dialog box will appear where you can enter a commit message.

- Select the checkboxes beside the files that you want to commit. Then press Commit.
- Close the dialog box that told you what Git just did for you.
- Next, close the RStudio: Review Changes dialog box.
- Add a second line to your pluto.txt file: “And it is cold and out of the way.”
- Save the file, and then Commit the file again in the same way you just did (steps b to h).
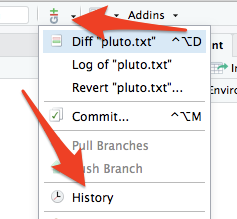
- Git History: If you’d like to see the history of commits you’ve made, press the Git icon in the top menu of RStudio, and then press History. You can now click on each of the checkins to see the comments and file changes.
- Open your RStudio repository in GitHub Desktop:
- In GitHub Desktop, select File then Add Local Repository…, then click the Choose button and navigate to the location where you created your RStudio project (e.g. ~/Documents/r-git ) and then press the blue Add Repository button.

- Lastly, let’s publish the repository to GitHub by clicking on the Publish repository button. Now you can share your repository and sync it with other computers.