Working with Files and Directories
Now that we’ve seen how to navigate files and directories in the shell, it’s time to get our hands dirty and to start using the shell to create a directory hierarchy and populate it with files.
Creating a Directory
To begin, use the cd command to move to the shell-lesson-data directory on your computer (you can double check that you’re in this directory using the pwd command). The first thing that we’re going to do is create a new directory within the shell-lesson-data directory.
mkdir
- Make a new directory
- Syntax:
mkdir new-directory-name
Using this command, create a new directory, *choosing whatever name you like.
A quick note on naming: The shell is quite particular in how it parses and sorts information, and a number of special characters have function in the shell. Knowing > that, following the file naming recommendations below will save you a lot of headaches:
- Only contain letters in the English alphabet, numbers 0-9, dashes -, and underscores _
- Do not use spaces or special characters such as:
!@#$%^&*()_+[]{}| - Separate naming elements with underscores and dashes
After creating this new directory, move into it using the cd command.
Creating a Text File
Nano is a text editor that can be used to create and edit plain text files via the shell. When we say “plain text”, it means that these files can only work with plain characters, and doesn’t work with tables, images, or any other media. There are many different text editors to choose from, but for the purpose of this lesson, we are going to use Nano because it’s one of the least complicated. As you move forward in your Unix journey, feel free to explore and play with different brands of text editors. In this lesson we’ll be working with .txt files, but there are other plain text file types that can be explored.
Nano syntax:
nano- opens text editornano + new-file-name- opens text editor and creates a new file with a specified name. You will need to enter.txtafter the file name so that Nano knows what kind of file to createnano existing-file-name- opens text editor to an existing file
Closing nano
Closing a text editor isn’t always the most intuitive thing (a big reason why Nano was chosen for this lesson as opposed to other editors). To close Nano, follow the steps below:
Ctrl + x- initiates closing the editor- You will then see text at the bottom of the shell that says, “Save modified buffer?” If you would like to save your file, press
y, if not, pressn - If you pressed
yto save your file, Nano will ask you to provide a file name. If you specified a file name when initiating Nano, or if you are editing an existing file, the name will already be written. If this is an unnamed file, you can give the file a name, then press enter. Nano will close, and the fill is now created!
Exericse 3
- In your new personal directory, create 3 .txt files containing:
- Your 3 favourite songs
- Your 3 favourite movies
- Your 3 favourite books
- Name each .txt file as you see fit
More Unix Commands
We’re now going to start moving files and directories around to create hierarchies. Hierarchies can be shallow, meaning that directories contain files but contain few or no sub-directories. Hierarchies can also be deep, in that a directory could contain several layers of sub-directories within it. It is completely up to you how you arrange your files and directory structures, but it’s always good to try to think about this structure before you begin a project to keep things as organized.
touch
- Creates a file that doesn’t have any content
- Syntax:
touch + new-file-name
cp
-
Copies a file. There are a few ways that this command can be used:
-
Copy a file to another directory, keeping the file’s name
-
Syntax:
cp file-path/file-name target-path
Exercise 4
- In your personal directory, make a new directory called “music”
- Copy the file with your 3 favourite songs to this directory, keeping the same file name
cp
- Copy a file to another directory, changing the file’s name
- Syntax:
cp file-path/file-name target-path/new-file-name
Exercise 5
- In your personal directory, create a new directory called “movies”
- Copy the file with your 3 favourite movies to this directory, giving the file a new name
cp
- Copy the file to same directory that its in, changing the file’s name
- Syntax:
cp file-path/file-name same-file-path/new-file-name
Exercise 6
- Copy the file containing your 3 favourite books to its current directory, giving the file a new name.
Danger Zone
We’re now moving on to commands that are a bit more dangerous than those that have already been discussed, in that files and directories can get lost or permanently deleted. Always ensure that you’ve backed up all your important files so you won’t have to deal with any uncessary headaches.

mv
Move a file from one destination to another. This command works with the same syntax as cp command, noting that files are being moved instead of copied. The one unique function that mv offers is that it can be used to change a file’s name, using the following pattern:
- Change a file’s name, keeping it in the same directory:
- Syntax:
mv file-path/file-name same-file-path/new-file-name
Exercise 7
- In your personal directory, change the name of the file containing your 3 favourite movies.
The mv command can also be used to change a file’s name when moving it to a new directory
- Change a file’s name, moving it to a new directory
- Syntax:
mv file-path/file-name target-path/-new-file-name
Now we’re going to move to a command that contains some real danger, in that it will delete a file with no undo button. Be cautious with this command, as you won’t be able to easily retrieve files that are deleted this way.

rm
- Removes a file
- Syntax:
rm file-path/file-name
Flags
In addition to the commands that we’ve discussed, there are a number of “flags” in Unix that allow us to change the behaviour of a command. For the purpose of this lesson we’ll only be discussing one flag, but for a comprehensive list, see the “Resources” section at the end of the lesson.
-r flag
This is called the “recursive flag”, and allows commands to operate on multiple files or whole directories. Without this flag, the previous commands we learned can only operate on single files.
To use the r flag, or any other Unix flag, place it after a command, and before an argument
Syntax: `command -flag path/directory-or-files
Erase a directory * Syntax: rm -r path/directory-name
Copy a directory * Syntax: cp -r path/directory-name
Putting It All Together
Moving back to the directory structure that you’ve created on your personal machine, we’ve made a bit of a mess! But that’s OK, because it’s very common for our files to get messy when working on a project. Let’s try to clean things up and put together a clean structure.

Exercise 8
Create 3 new .txt files:
- One that contains your favourite breakfast food
- One that contains your favourite lunch food
One that contains your favourite dinner food Name the files, respectively,
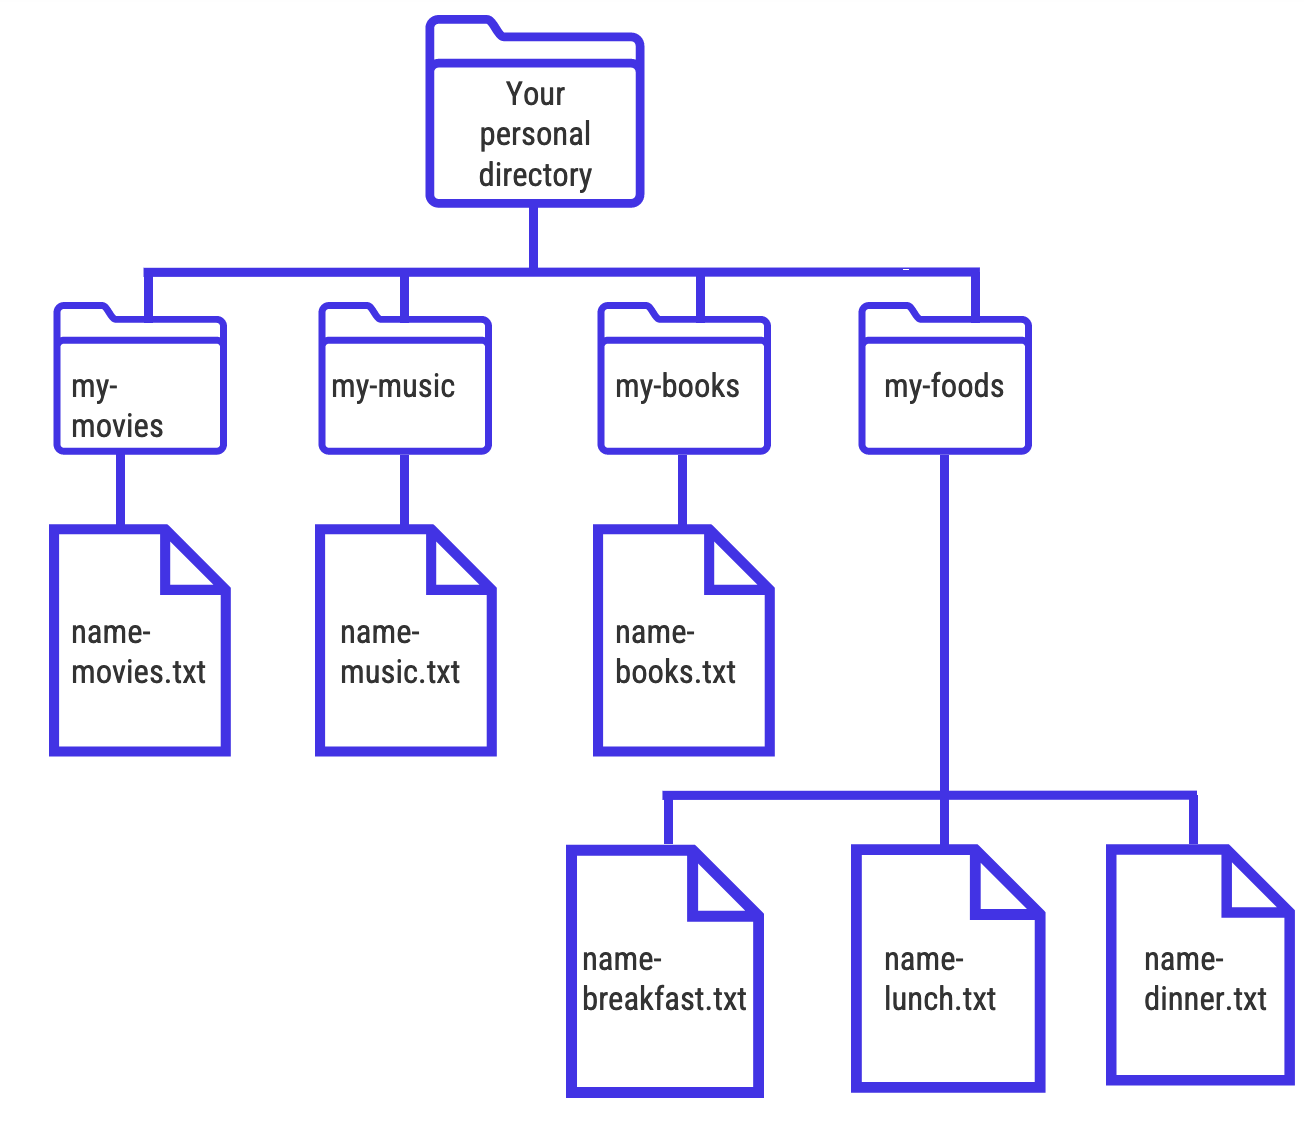
breakfast.txt,lunch.txt, anddinner.txt- Recreate the directory structure below with the files you’ve been working with. The
my-movies,my-music,my-books, andmy-foodsdirectories contain the .txt files with your favourites: