Navigating the RStudio Interface
- 1 Getting familiar with the RStudio Interface
- 2. Working in the Console
- 3. Working in the Code Editor
- 4. A Final note

1 Getting familiar with the RStudio Interface
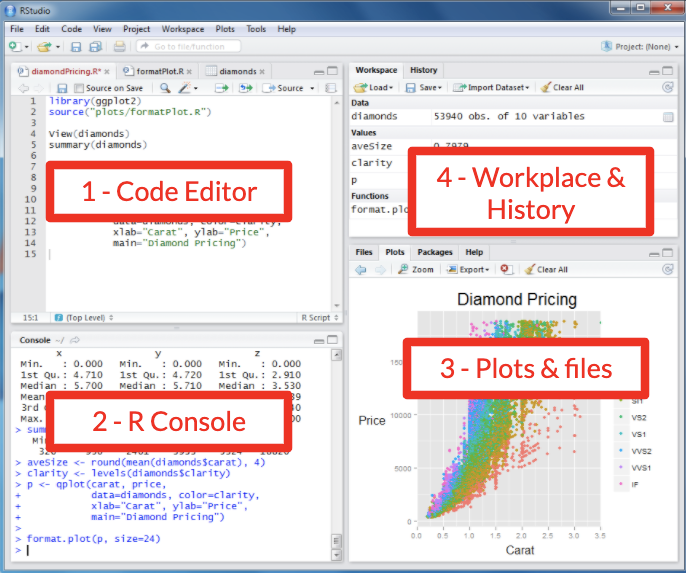
The RStudio interface is divided into several key areas, each serving a specific purpose.
- You can rearrange these windows and tabs to fit your personal preference by dragging them around the workspace.
- When you rearrange the panes in RStudio on your computer, the layout stays as you set it across future sessions.
1.1 Code Editor:
The code editor is where you write and edit your R scripts. It includes syntax highlighting, code completion, and other helpful tools to make coding easier.
The code you write in the editor is just text. RStudio will not execute the code unless you tell it to. To tell RStudio to execute the code, you need to send the code to the console (i.e., “source” or “run” the code). We will see how to do that in section 3.2.
1.2 Console:
The console is where R code is executed.
You can type commands directly into the console, like a scratch pad. It also displays outputs, messages, and errors.
When you close RStudio, nothing that was written in the console is saved. If you want to be able to use your code in the future without needing to retype it, write it in the code editor, where it will be saved for future use (that is, provided you remember to save the file of your script).
Therefore, you will not want to write your code directly in the console, unless you are just testing small code snippets and commands, or asking to see the results of commands already executed.
1.3 Files/Plots/Packages/Help Pane:
Files: Browse, open, and manage files in your working directory.
Plots: View graphical outputs from your R code, such as plots and graphs.
Packages: Install, update, and load R packages.
Help: Access R documentation and help files for:
- Functions and packages
- Example code
- Information about datasets built into R
- Information about other general R-related topics.
Viewer: Used to view local web content.
- We won’t be covering this
- E.g., web graphics generated using packages like
- googleVis,
- htmlwidgets
- rCharts
- local web application created using Shiny, Rook, or OpenCPU.
- See more at the RStudio Viewer Page
Presentation: You can use RStudio to create presentations (see more here).
1.4 Environment/History Pane:
Environment: Shows your current workspace, including:
- Created objects (i.e. vectors, data frames, etc.)
- Functions you created or loaded
History: Records all the commands you’ve run in the current and previous sessions.
Connections: For more advanced users, used to manage and configure the integration of data sources with your projects.
- E.g., Oracle, SQL, Salesforce
Tutorial: Used to run tutorials that will help you learn and master the R programming language.
- See more at the RStudio Tutorial Page
⭐ Task 1-1
Open RStudio
Get familiar with the interface by identifying the 4 windows and switching between the tabs. This task is just for you to get comfortable. There is no solution for this task.
2. Working in the Console
The console is the action center where your code gets executed immediately. It’s great for quick experiments or testing ideas, but it doesn’t save your work!
This is also where you install packages. Packages should be installed through the console, and loaded through the code editor.
Each new line of code (aka. command line) begins with the angle bracket > also known as the ‘prompt’ symbol.
Commands will be written or run into the Console after the most recent angle bracket >.
command line: lines of code in your console.
‘prompt’ symbol > : Each new command starts with this.
execute: run your command by pressing the ‘enter’ or ‘return’ key on your keyboard.
- When you are ready to execute (‘run’) the command, type ‘enter’ or ‘return’ key on your keyboard.
- The output of the command will appear below your command.
Things to be mindful of:
-
You cannot execute a command until the previous command has been completely executed.
-
If you don’t see the prompt symbol
>, one of two things is happening: -
1 - R is still processing your previous command, and you must wait for it to finish.
-
2 - You might instead see the plus
+symbol, which indicates that you have entered an incomplete command (e.g., you are missing a closing bracket). -
If you see the
+symbol, you must enter the remainder of the command before entering a new one. -
An error will occur if you write the
+symbol into your command. -
Sometimes the output can be extensive and show more information than you expect (e.g., when you load in a package (we will discuss packages more in Activity 3).
⭐ Task 1-2
Try getting help!
To do this, you’ll run the help() function.
For example, help("mean") will provide you with information about the mean function in RStudio. The help information will be displayed in the Help pane following your command.

Task: Now try getting information on vectors.
Check your code
# Get additional information about "vectors" (a data type),
help("vector") # then type 'enter' or 'return'
## starting httpd help server ... done
Note: You can get help on related content by selecting the dropdown list at the top of the Help tab.
3. Working in the Code Editor
The code editor is where you write and organize instructions in a script for R to follow. Think of it as a smart notepad that not only helps you learn and experiment but also allows you to save your work for later use. By writing code in the editor, you can easily reuse and adapt your scripts, and share them with collaborators
⭐ Task 1-3
Create a new R script.
- Click File > New File > R Script.
- Save your script: A blank script opens in the code editor. Save it by clicking
File>Save(choose a name and location).
- It is useful to store all related files in one folder, such as this script and any data you import/export here (see more on working directories in Section 3.1)
- A blank script opens in the code editor. Start typing your code as you would in the console.
3.1 Tips for writing code in an R script:
- To add comments, begin your note with a hash
#. R will execute each line until it encounters a hash, so nothing after a hash will be executed, making it great for adding comments.
# this is a comment
this is not a comment, and will cause an error
## Error in parse(text = input): <text>:1:6: unexpected symbol
## 1: this is
##          ^
- Use meaningful names. Note: We will learn more about creating R objects in the following section (in R, we create and store information in what are called virtual “objects” that are stored in the R environment, or workspace)
# BAD naming
a.dim1 <- 10 # height of plant 1
b.dim1 <- 5 # height of plant 2
# GOOD naming
pl1.height <- 10
pl2.height <- 5
-
Order your code logically.
- If you want to run your code all at once (perhaps using a different data source), it will run each line in order.
3.2 Running your code
Run (or source) a single line of code:
-
Click anywhere on the line you want to run.
-
Press Ctrl + Enter (Windows/Linux) or Cmd + Enter (Mac). Alternatively, you can click the “Run” button at the top right corner of the script editor pane.
Run (or source) multiple lines of code:
-
Highlight the lines you want to run.
-
Press Ctrl + Enter (Windows/Linux) or Cmd + Enter (Mac). Alternatively, you can click the “Run” button at the top right corner of the script editor pane.
- Say you have created two separate R objects for different dimensions of a rectangle, as well as a third object that multiplies those two dimensions to calculate the area. You have also run all of the code line by line as you created each object (Ctrl + Enter (Windows/Linux) or Cmd + Enter (Mac)).
rectangle1.length <- 10 # Line 1
rectangle1.width <- 5 # Line 2
# `*` is for multiplication
rectangle1.area <- rectangle1.length * rectangle1.width # Line 3
- You then edit
rectangle1.lengthto15andrectangle1.widthto8, but you don’t run each line as you edit it. Your code editor will look like this:
rectangle1.length <- 15 # Line 1
rectangle1.width <- 8 # Line 2
rectangle1.area <- rectangle1.length * rectangle1.width # Line 3
- However, if you do not run these lines of code (i.e., send them to the console to execute), R won’t know that you updated the values. You can check the Environment panel on the upper right to see the current value R associates with each object.
- If you run only Line 1, the value of
rectangle1.lengthwill change, butrectangle1.widthandrectangle1.areawill not change. - If you run only Line 2, the value of
rectangle1.widthwill change, butrectangle1.lengthandrectangle1.areawill not change. - If you run only Line 3, no values will change.
- If you select lines 1, 2, and 3, all values will change.
Run (or source) the entire script:
-
Save the script (optional but recommended).
-
Click Source at the top-right corner of the script editor, or press Ctrl + Shift + Enter (Windows/Linux) or Cmd + Shift + Enter (Mac).
3.3 Deleting objects
Deleting the line of code from the script in the Code editor that created an object will not cause the object to be removed.
To delete an object, use the rm() function in the console. Then, if you do not want to create the object again in the future, delete the line of code in the Code Editor.
# Line 1 is deleted
rectangle1.width <- 5 # Line 2
# `*` is for multiplication
rectangle1.area <- rectangle1.length * rectangle1.width # Line 3
rm(rectangle1.length) # Run in the code editor to remove the object from your entire environment
WARNING: If you remove an object that another object depends on, you will see the following error: Error: object 'object name' not found.
For example, after removing rectangle1.length as above, try running line 3 of the code.
Carefully consider the consequences of removing objects before doing so.
⭐ Task 1-4
Test editing objects.
Copy and paste the following code into your new R script (in the code editor).
-
Edit the values for
rectangle1.lengthandrectangle1.width, and run each line(s) of code in different orders to see what happens. -
Then try deleting different objects through the code editor and the console.
rectangle1.length <- 15 # Line 1
rectangle1.width <- 8 # Line 2
rectangle1.area <- rectangle1.length * rectangle1.width # Line 3
We’ll get to different types of objects in the next activity.
4. A final note
Understanding the differences between writing code in the Code Editor and in the Console takes time, but it’s essential for using R efficiently and effectively. To support that learning process, we recommend a small but important change to RStudio’s default settings.
By default, RStudio often saves your entire workspace when you close the program and reloads it when you reopen it. Although this might seem convenient, we strongly discourage it for two main reasons: 1. It wastes memory. For large or complex analyses, saving your whole workspace can take up significant storage. A well-written script should let you recreate all your objects simply by rerunning the code, so you only need to save your script—a lightweight text file. 2. It slows your learning. Automatically reloading objects can make you less deliberate about what your script actually produces. Starting each session with a clean workspace encourages you to think clearly about which objects should be created, saved, or discarded
To turn off this setting, you should: - Click on “Tools” in the toolbar, and select “Global Options…” - Under Workspace, uncheck “Restore .RData into workspace at startup” - In the “Save workspace to .RData on exit”, select “Never” - Click on “OK”. Done!
📍 As you work through these activities, remember to save your script(s) regularly. To do that, click on File > Save (or hit cmd+s on Mac, or ctrl+s on Windows)