Ice Cream Model Activity
3D Modelling is tricky to learn, so let’s create an extremely simple ice cream cone to go over some basic Blender tools! If you want to take your ice cream model to the next level, try the next exercise too!
1. Opening a new File in Blender

-
Open Blender. A window should pop up that shows “New File” and “Recent Files”. On the left under “New File”, select “General” to open a new file in a general workspace. A “General Workspace” means your Blender application will be set up so you have access to a large variety of different tools rather than specialized tools.
-
If you already have Blender open, simply navigate to “File” in the corner, select “New”, and then “General”.
2. Creating the cone
To begin, we are going to “Add” three different shapes to the viewport that we will combine together to make a basic ice cream cone.
-
If you are beginning with a square in your scene, right-click on the square and select “Delete” at the bottom of the window. Now your viewport is empty.
-
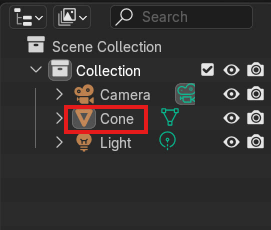
Add a cone to your viewport by navigating to “Add” at the top left side of the screen. Mouse over “Mesh” and left-click “Cone” to add to your viewport.
- Select “Scale” on the left tool bar and left-click the blue square at the top to drag upwards. Finish dragging by left-clicking when you achieve the ideal shape for your ice cream cone.

-
Select “Rotate” on the left tool bar and navigate to the properties tab on the right hand side. Under transform, there is a Rotation X, Y, and Z. Click on the 0 to the right of the Rotation Y and change the value to 180. This should flip your cone around so it’s standing up.
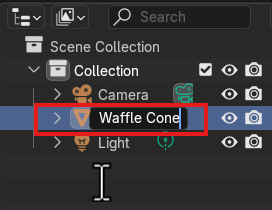
- Look to the right of the viewport in the top right window. There should be a list that says “Camera” “Cone” and “Light”. These are all of the things that are in your file right now. Double-click on the word “Cone” and rename it to “Waffle Cone”. *Note: your viewport will have a camera and light in it by default and these are important to keep there for if you want to render an image of your ice cream cone after!
3. Creating your icecream scoop
-
Add a sphere to your viewport by navigating to “Add” at the top left side of the screen. Mouse over “Mesh” and left-click “UV Sphere”.
-
Select “Move” on the left tool bar. Using the blue arrow pointing up, left-click on the arrow head and drag your ice cream up until it’s on the top of the ice cream cone then left-click again to confirm.
- If your ice cream scoop is too large or small, select the “Scale” option on the left tool bar and click the white ring around the UV sphere to change the scale of the entire UV sphere. If you want to change just the height, use the blue square.

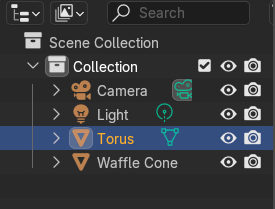
- Now, add a “Torus” into the viewport by going to “Add”, “Mesh” and then “Torus”. Raise your torus up by selecting “Move” on the left tool bar and bring it up to the area where the ice cream meets the cone. Alter the size by using “Scale” and using the white circle to click and drag the torus into a size that looks like the part of an ice cream scoop that is overlapping the edge of the cone.

- Look in the outliner window and note that there should be five objects in it: “Camera, Waffle Cone, Light, Sphere, and a Torus”.
4. Joining objects
Now, we want to turn the torus and the cone into the same shape so that we can edit them together.
-
Begin by left-clicking on the “UV Sphere” and then holding shift to select the torus at the same time.
-
Navigate to “Object” which is beside the “Add” button. Left-click on it and then choose “join”. Now your objects should be conjoined and your outliner will have conjoined the UV Sphere and Torus into the same object. Whichever object you click on first when joining them together is what the new object will be named. In this case, I selected the UV Sphere first so the conjoined object is named “UV Sphere”.

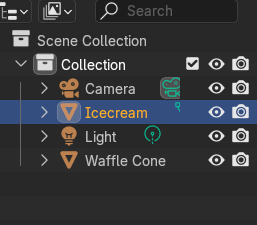
- Go to your outliner window and double-click the word “UV Sphere” to change it to “Ice cream”
Wonderful, now you have created the basic ice cream cone model! If you want to take it to the next level, try the next activity.