![]()
Interface Intro Activity
If you and your group have any questions or get stuck as you work through this in-class exercise, please ask the instructor for assistance. Have fun!
1. Opening a new File in Blender

- Open Blender. A window should pop up that shows “New File” and “Recent Files”.
- On the left under “New File”, select “General” to open a new file in a general workspace. A “General Workspace” means your Blender application will be set up so you have access to a large variety of different tools rather than specialized tools.
2. Deleting and Adding Objects
You will start with a cube in your scene. For the sake of the exercise, we are going to delete the cube and then re-add it.
- Right click on the cube and select “Delete” at the bottom of the pop up window. You can also delete by left clicking the square and pressing Delete on your keyboard.
- Go to “Add” At the top left of the viewport (the area in which your cube was) and click on “Mesh”.
-
Select “Cube” option. Now you have successfully deleted and added an object into your scene file. Keep the cube in your scene.

3. Saving in Blender
It is important to save frequently when using Blender. If your application crashes, it is likely you will lose your unsaved work.
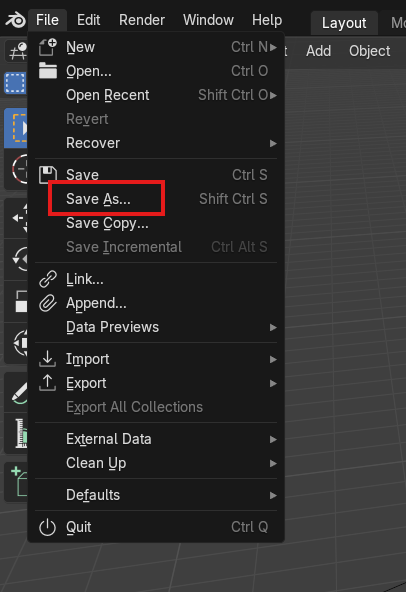
- To save, move your cursor to “File” in the top left corner of the application. Select and drag down to “Save As”. Navigate through your files to a desired saving location, name your project and save.
Tip: To save your progress while working, you can also use the shortcut “CTRL+S” on Windows or “COMMAND+S” on MacOS
4. Navigating the Viewport in Blender
The window that your cube is in is known as the “Viewport” and can be tricky to learn how to navigate. Here are some keyboard shortcuts to memorize so you can move around your cube. Practice!
- Pan= Shift + Middle Mouse Button + Drag Mouse
- Zoom= Middle Mouse Scroll
-
Rotate= Middle Mouse Button + Drag Mouse

5. Trying the Gizmo
If you’ve never worked in a 3D space before, it’s important to learn how to change the view of your object. 3D workspaces are measured by 3 dimensions and so your workspace is as well. Think of it like Height, Width, and Length: Z being height, and Y and X being the width or length. 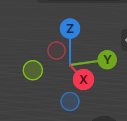
- Navigate to the top right window of your viewport, you’ll see a red, blue, and green shape with a Z, Y and X in it called a “gizmo”. It is a visual representation of the angle you are looking at your scene from. When you move your cursor over to it, it should light up and be enclosed in a circle.
- You can left-click anywhere within and drag rotate the gizmo to rotate your scene as well. Or you can select a dimension (Z for example) to snap to a profile shot of that dimension also known as an “Orthographic View”. To escape from the profile orthographic view, simply rotate out of it by using the shortcut listed in #4.
Now you can move around your object! This is important so you can see it properly from all angles during the modelling process. Feel free to review this page more to familiarize yourself with these concepts.
Awesome work. You’re ready to move on to the next activity!