Inserting Tables and Figures
If you and your group have any questions, or get stuck as you work through this in-class exercise, please ask the instructor for assistance. Have fun!
-
Immediately below
\end{enumerate}type\newpage -
Using Chapter 4 (pg. 17-18) of this file for reference, write code below your most recent
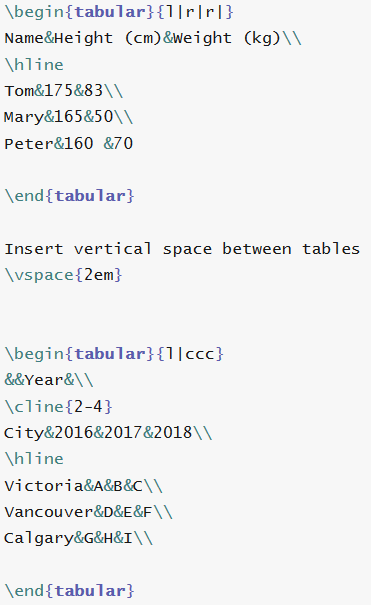
\newpageline to produce the tables below: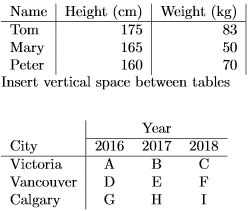
-
Immediately below the last
\end{tabular}type another\newpage -
Insert and refer figures
Download the figure from here first. Upload the picture by clicking the upload icon on the top of the page, and then “Files… → Computer”. Then, at the top of your document, type
 \usepackage{graphicx}directly after the\documentclass[a4paper,12pt]{article}and above the\title{Introduction to LaTeX}. This will load the packagegraphicx, which is required to add figures. Type the following codes below your most recent\newpage. The comments after%explain what each lines does.\begin{figure}[h!] % This begins a figure environment; [h!] tells LaTeX to place it "here" if possible, overriding other placement rules \centering % Centers the figure horizontally on the page \includegraphics[width=1\textwidth]{uvic.png} % Includes the image file 'uvic.png', scaling it to the full width of the text area \caption{This is caption} % Adds a caption below the figure \label{fig:uvic} % Assigns a label to the figure for referencing it elsewhere in the document (e.g., \ref{fig:uvic}). See next steps \end{figure} % Ends the figure environmentThen, type the following anywhere in the text to refer to the figure. Example:
Please see Figure~\ref{fig:uvic}. Note: the label “uvic” for the figure should be the same as the label determined in the\labelcode above.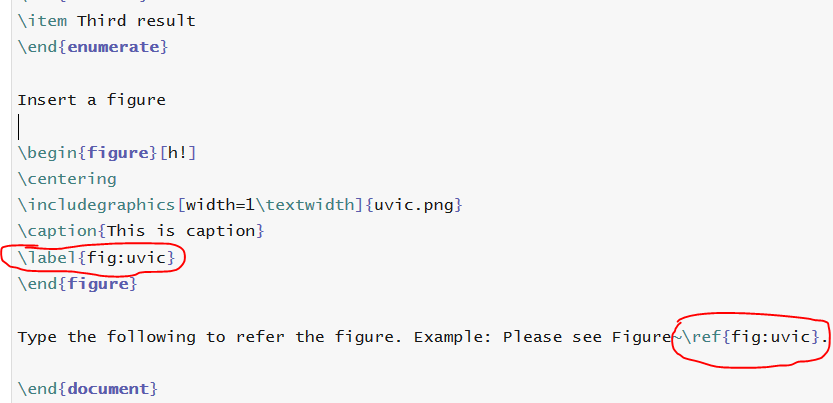
-
Immediately below the line referring the figure, type another
\newpage -
Create a three-line table (research paper style)
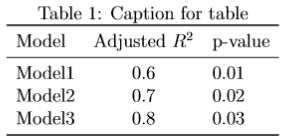
First type:
\usepackage{booktabs}and\usepackage{graphicx}at the top of your document after the\documentclass[a4paper,12pt]{article}and above the\title{Introduction to LaTeX}. Then type the following codes below the most recent\newpage\begin{table}[htbp] % Starts table environent \centering \caption{\label{tab:test}Caption for table} % Assigns label and caption. Label cna be used to reference table in text. \begin{tabular}{lcl} \toprule Model & Adjusted $R^2$ & p-value \\ \midrule Model1 & 0.6 & 0.01 \\ Model2 & 0.7 & 0.02 \\ Model3 & 0.8 & 0.03 \\ \bottomrule \end{tabular} \end{table} % Ends table environmentNote: in the
\begin{tabular}{lcl}, you should type the “l” (in short for left) rather than digital number 1 and ‘c’ (in short for center). {lcl} is used for the column alignment in the table. There are three options for column alignment, namely l (left), c (center) and r (right). You can change this part as you like. -
Ensure that the following codes are inserted into your main body, anywhere below the
\begin{document}but above the\end{document}.
-
Reference a table
Type the following in your paragraph to refer the table:Please see Table~\ref{tab:test}.Note that this should be the same label that you assigned to the table in the code above. -
Insert a footnote
Type the following:This is the footnote.\footnote{Footnote text.} -
Add Verbatim text
  \begin{verbatim}
  The verbatim environment
   reproduces every input,
  including  s p a c e s!
  \end{verbatim}