Snowperson Ornament Activity
-
If you haven’t already, please go to the TinkerCad website and create an account for yourself. If you find yourself in a tutorial, click on the Tinkercad logo in the top left of the screen to exit to the home page.
- Click Create new design. If the TinkerCad tutorial pane is up on the right-hand side, you will need to get out of it before proceeding. Click on the TinkerCad logo at the top to bring you back to your main page. From there you should see the Create new design button.
- On the right side of the TinkerCad open a drop down menu by clicking on Basic Shapes, grab a sphere and drag it onto the workplane
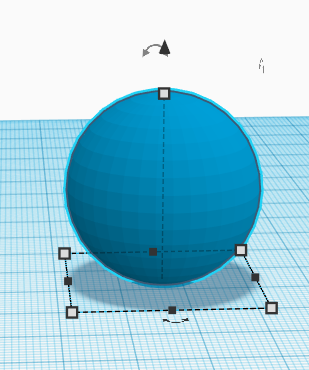
- Select the shape, and a grid should pop up around the shape. Using the white corner handles, stretch the sphere so that it is 30mm for all three dimensions.

- Select the shape, and a grid should pop up around the shape. Using the white corner handles, stretch the sphere so that it is 30mm for all three dimensions.
- From Basic Shapes, grab a hollow box
- Change the size of the hollow box to 30mm wide, 30mm long, and 4mm tall
- With the shape selected, press D to drop it flat on the workplane.
- Select both the ball and the hollow box.
- Now select the Align tool from the top menu. Two black centre handles should appear. Double click on them
- Click on the Group button on the top menu. This will group the box and sphere together. Then, press D to drop the flat bottomed sphere.

- From Basic Shapes, add a second sphere:
- Stretch it to 25mm across all dimensions.
- Using the black triangle on top, lift it from work plane 14mm
- Align the sphere on the larger sphere, and Group.

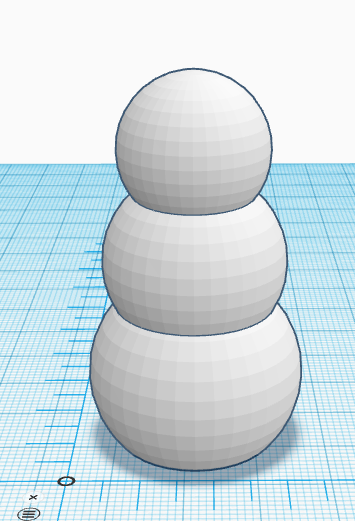 From Basic Shapes, make a third sphere:
 - Stretch it to 20mm for all dimensions.
- Using the black triangle, lift from work plane 32mm
- Align all objects and Group.
- From Basic Shapes, add a cylinder to the workplane
- Using the white corner handles, set all dimensions at 2.5mm
- Select the object. A circular, black two-ended arrow should pop up. Select that to rotate the shape -90 degrees.

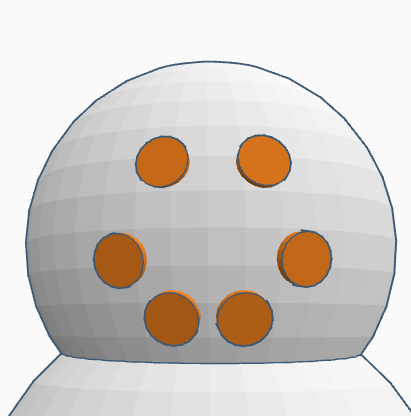 Using copy and paste, duplicate this shape 5 times
 - Select the black triangle on top of each cylinder to raise it to the height of the spheres. Attach them on to make a face (or buttons!)
- You can shrink and rotate here to make your smiley face look nice however you like
- Now, your snowperson needs a hat!

- From Basic Shapes, select a cylinder. Make it 18mm long by 18mm wide, and 2mm tall.
- Make a second cylinder that is 14mm long by 14mm wide, and 7mm tall.
- Align the two cylinders, and group them.
- Raise your hat 52mm from the workplane, and align it to your snowperson. You can tilt it a little, or leave it flat.

- Add a cylinder onto the workplane
- Make it 7mm long by 7mm wide and 4mm tall.
- Next, select a hollow cylinder. Make it 5mm long, 5mm wide and 4mm tall
- Set the hollow cylinder inside of the larger one. Align both shapes, and then Group them
- Rotate the new tube 90 degrees so it is standing on its round edge, and align to the top of the snowperson
- Raise the ring 56mm, and center it on the snowperson.

-
Congratulations on your hanging snowperson ornament!
- Lastly, click on the “Export” button on the top right of the toolbar, and then select “.STL” and save the file to your hard drive so you can 3D print your snowperson!