Activity: Youth Climate Marches

-
Creating a project and navigating the workspace
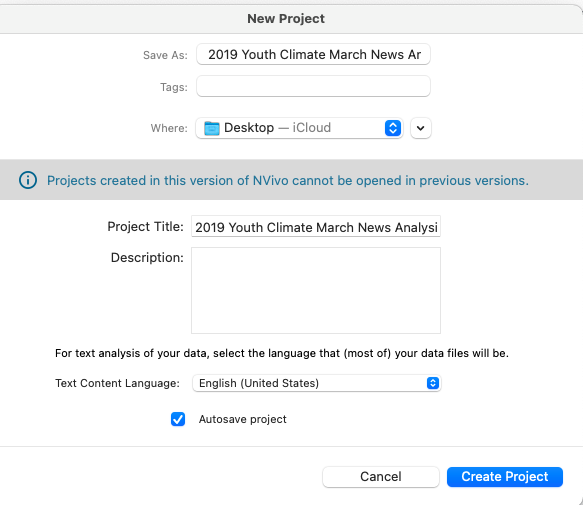
- Open NVivo and select Create a New Project
- In the dialogue box that opens, save your project as “2019 Youth Climate March News Analysis”
- Choose where to save your project
- click Create Project
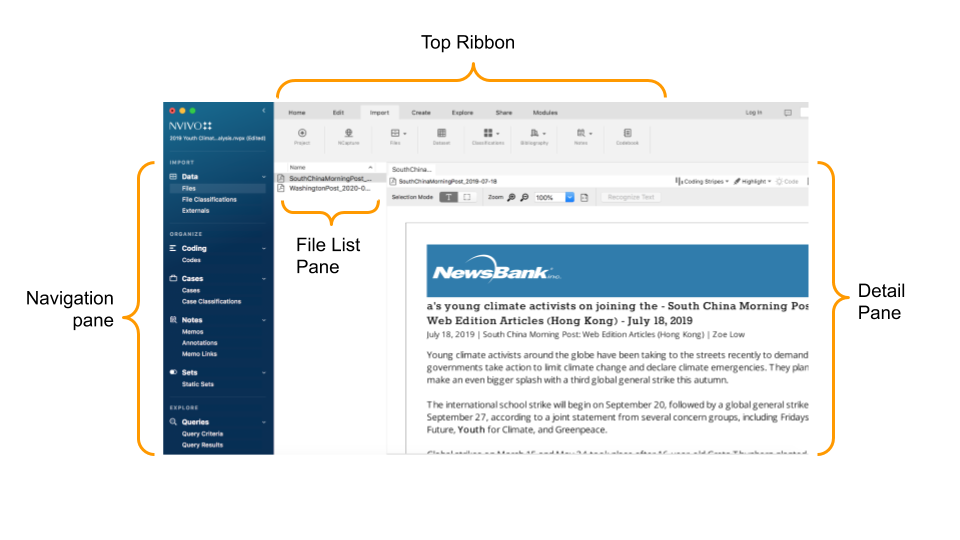
There are 4 key areas of the NVivo workspace:- Top Ribbon - all of the commands and options in NVivo are found here
- Navigation Pane - where you view and organize your files
- File List Pane - displays contents of folders selected in the navigation pane
- Detail Pane - displays contents of files and project items
- Importing your files
- Download the two workshop activity files from this directory
- Select the Import tab on the top ribbon, and then Files, and then from the drop-down menu choose Documents
- Navigate to the two files you just downloaded. Select the two text files and click Import
- In the File List Pane, you’ll see the files you just imported.

- Coding text files with codes
- Codes are labels that help you group together pieces of data that relate to the same idea, theme, or concept. When you code text (or audio, images, etc.), you are marking those sections so they can be easily retrieved and examined together later.
- Select the Files icon in the Navigation pane and double click the “SouthChinaMorningPost_2019-07-18.pdf” text file listed in the File List pane to open it in the Detail pane. Read through the document and keep an eye out for key issues and themes brought up by each of the speakers in the 9 countries covered. In the following steps we will code and organize themes identified in the document by creating a series of codes.
- Coding at a new code: The speaker from Australia mentions increasing summer temperatures. To create a code representing this theme, highlight the related sentence, ctrl-click the highlighted text and select Code Selection and then At New Code. Title your new Code “increasing temperature”

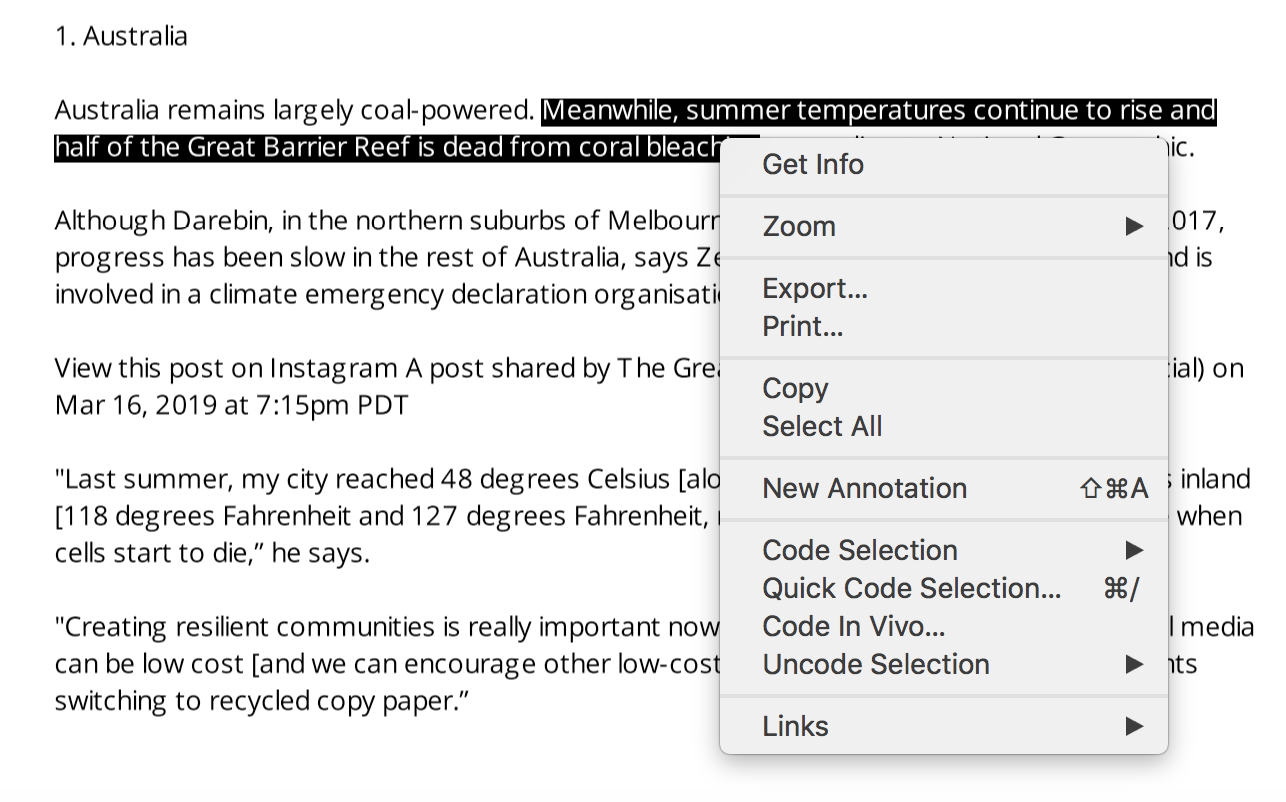
- Coding at an existing code: The speaker from Vietnam also talks about increasing temperatures. Ctrl-click the highlighted text, select Code Selection and then To Existing Codes and Cases and select “increasing temperature”

- You can code the same pieces of text as multiple themes. In this same text we coded as “increasing temperature” from the Australian speaker, they also mention coral bleaching. Create a new code for this topic and recode this sentence

- Highlighting Codes: To see what portions of text in your document have been coded, at the top of the detail pane, click the Highlight icon and select All Coding. If you want to only see specific codes highlighted in the text, select Coding for Selected Items and pick from the list displayed, then click Select

- Coding Density: Coding density is a visual indicator that shows how much of a section of text has been coded. To get a visual sense of the coding density of your codes and spot patterns in the distribution of topics, turn on coding stripes. Make sure the “SouthChinaMorningPost_2019-07-18.pdf” file is visible in the detail pane. At the top of the detail pane, select the Coding Stripes icon and, in the drop-down menu, select All

- Key Themes: Continue coding the rest of this document by creating codes and applying them to the sentences they are contained in. Identify themes related to:
- i. Impacts
- ii. Barriers
- iii. Solutions
- Aim to identify at least 3 to 5 themes in each response. If you need to remove codes, highlight the piece of text, right-click and select Uncode Selection

- Creating Code Hierarchies: As you create more and more codes, you may start to see a hierarchy of themes emerge. You can group codes into parent or child categories. Using the “Impact”, “Barriers”, and “Solutions” themes, organize your codes into a hierarchy. To do so, first create a new code titled “Barriers”. Double click the Coding icon in the navigation pane to display it in the file list pane. Click the Code icon in the top ribbon under the Create tab. Click New Code. In the dialogue box that appears, name a new code “Barriers”
- With your codes list displayed in the file list pane, you can drag and drop the child codes representing barriers onto the parent code to create a hierarchy. Repeat for codes representing Impacts and Solutions
- It can be helpful to group references from all child codes together under a parent theme. To copy the coding from the child codes to the parent code, in the list view ctrl-click the new Barriers code and select Aggregate Coding From Children

- Removing Child Codes: To remove a child code from a hierarchy, ctrl-click the code and select Move to Top Level

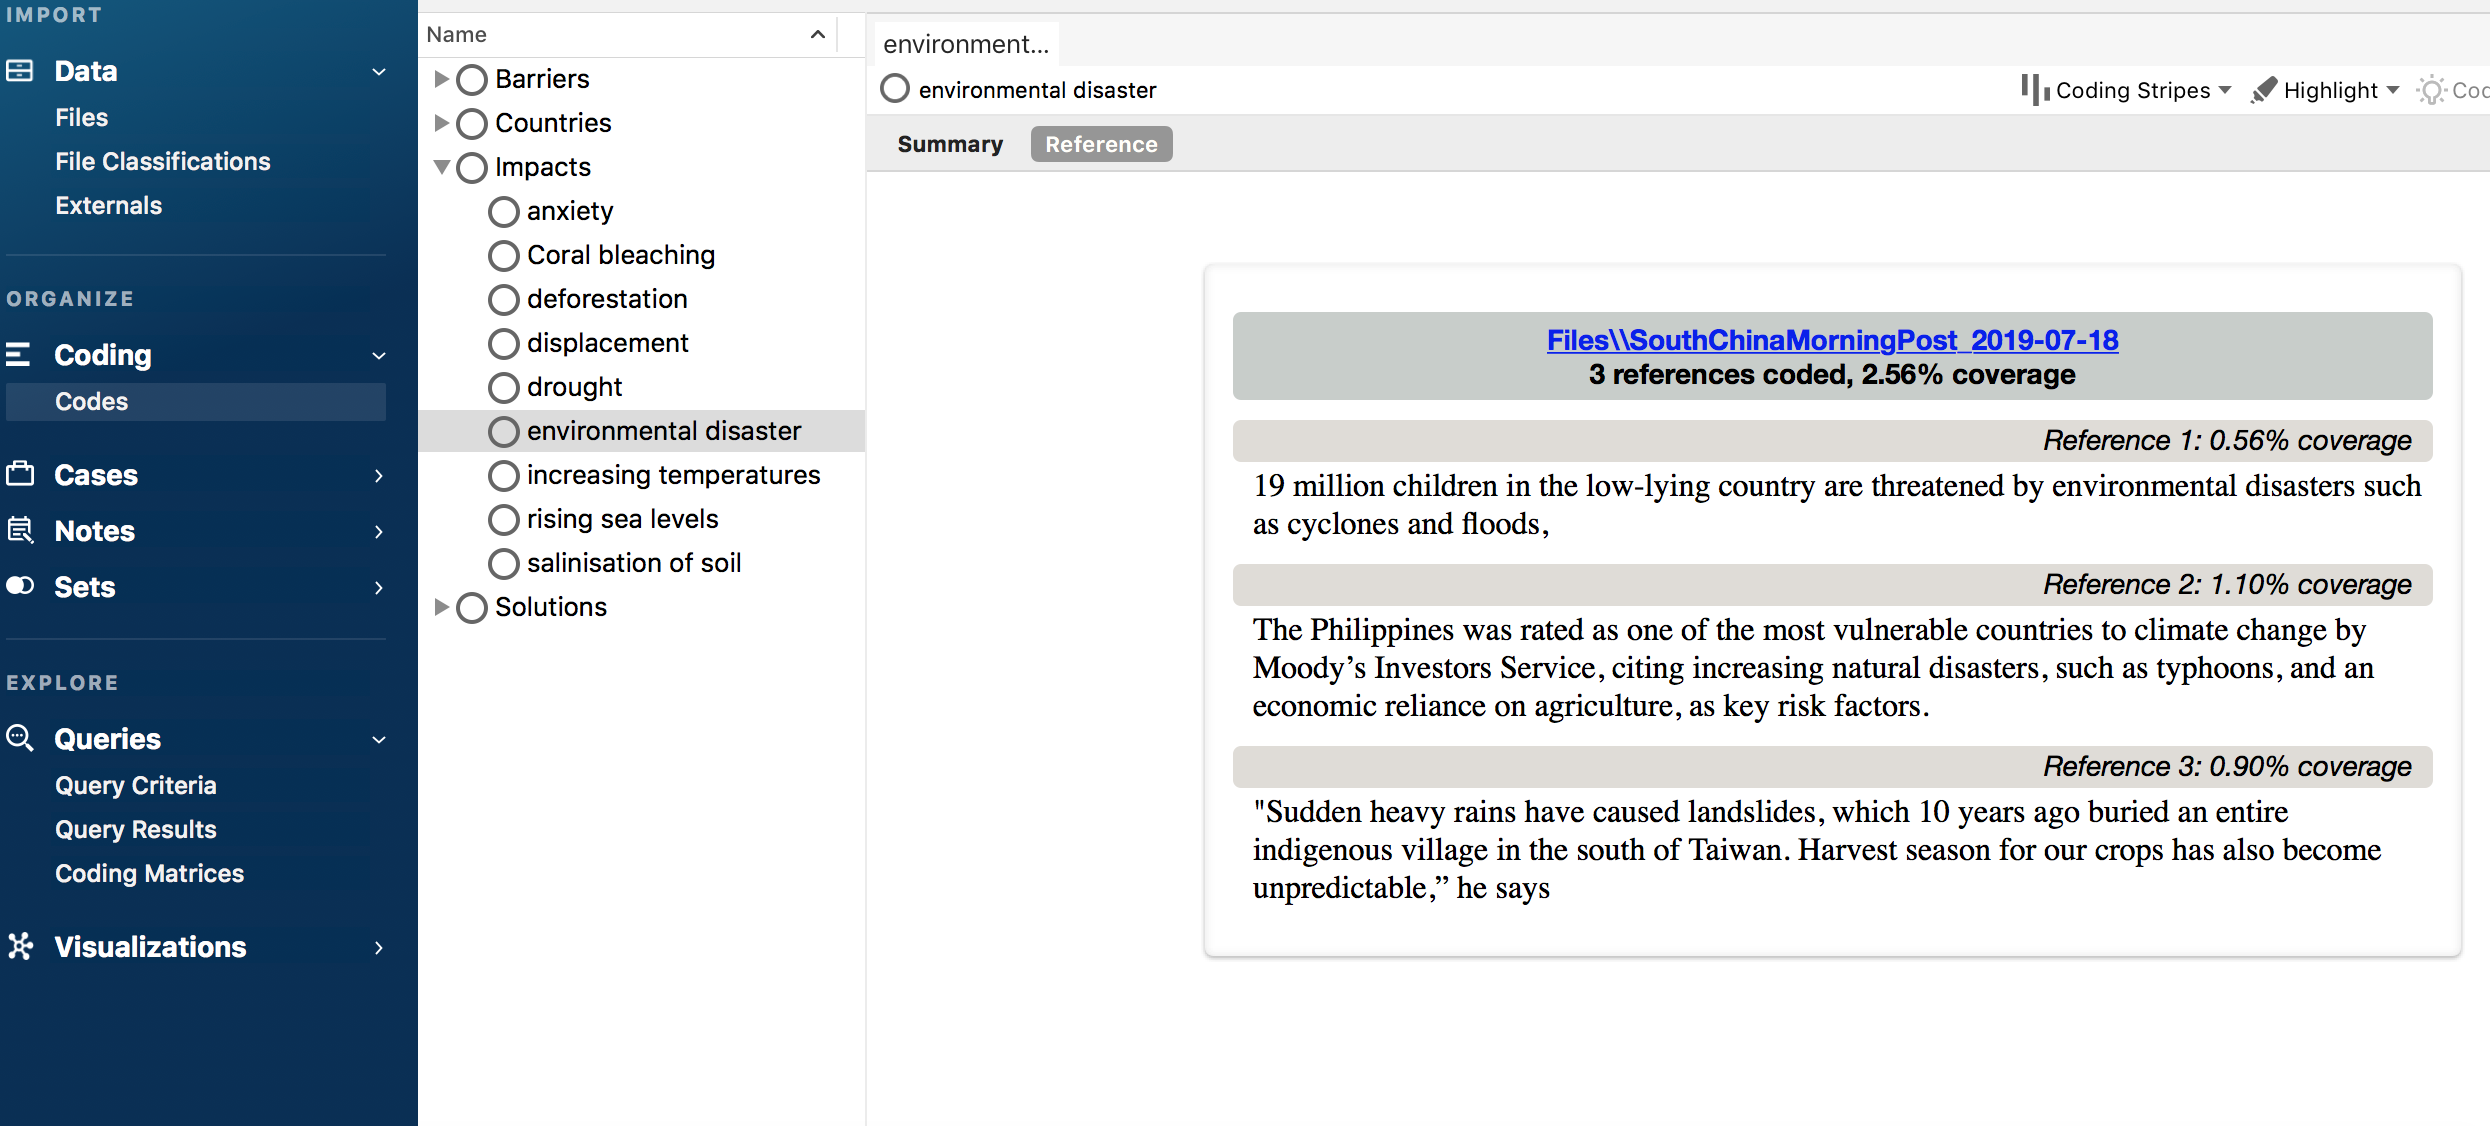
- Viewing Code References: To view all the pieces of text coded at a given code, from the file list pane double click the desired code. This will open up a window in the detail pane with all the references.
- Time permitting, repeat the above exercise for the “WashingtonPost_2020-02-03.pdf” file continuing to use and build upon your themes hierarchy
- Word frequency queries
- Word frequency queries show you the most commonly used words in a document, helping you get an initial sense of key topics and potential codes before you begin coding.
- Running a word frequency query can help you establish codes prior to coding and give you a sense of the content of your file. Click the Explore tab in the Top Ribbon, and then click the Word Frequency icon
- The Word Frequency Criteria menu opens in a new window. Click the Search in Selected Items button to choose which file(s) to search. In the dialogue box that appears, select the “WashingtonPost_2020-02-03.pdf” file, then click Select
- In the Word Frequency Criteria menu, you can adjust the parameters of your search, including the number of results to display, the minimum word character length for inclusion in the search, and how to group similar words together in the search. Click Run Query to execute the word frequency calculation. How do the results compare with your codes?

- Try modifying these parameters and see how your results change. Make sure to click Run Query each time to re-execute the query
- Ctrl-click terms you want to exclude from your results and select Add to Stop Words List. To view words in the stop word list choose File then Project Properties, click General and then click the Stop Words button
- To save the query, click the Save Criteria button. The results will be saved in the Queries folder in the navigation pane.

- Text search queries
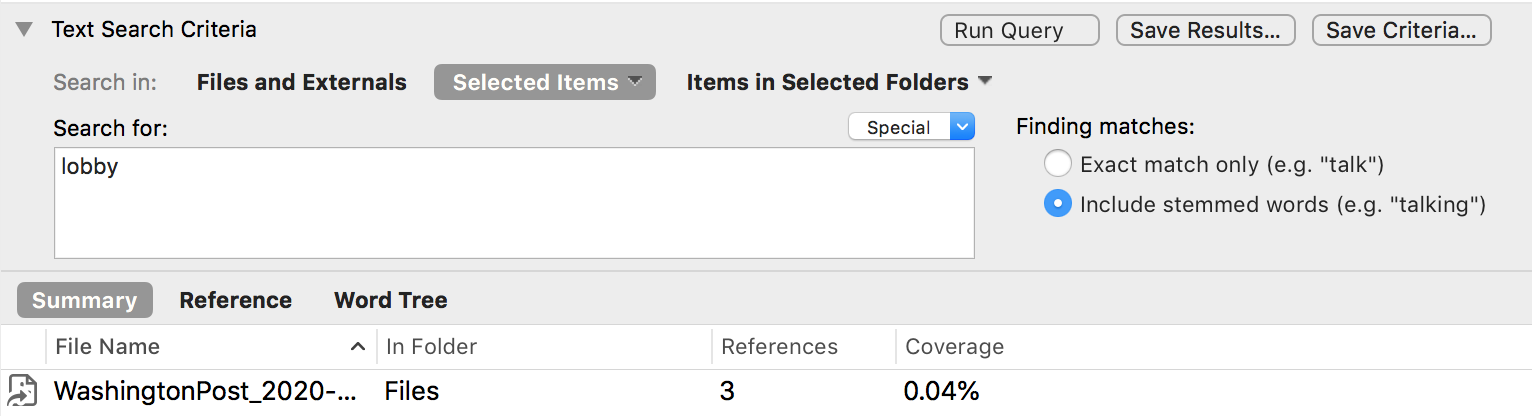
- Text search queries allow you to search for particular words or phrases within and across the documents you have imported into NVivo. Click the Explore tab in the Top Ribbon, and then click the Text Search icon
- The Text Search Criteria menu opens in a new window. Click the Search in Selected Items button to choose which file(s) to search. In the dialogue box that appears, select the “WashingtonPost_2020-02-03.pdf” text file, then click Select
- Open the list of codes in the file list view pane. Let’s see whether any of the themes we identified in the first debate are also discussed in the second debate
- Enter the term “drought” into the text search box and click Run Query. 1 reference should be found
- Play around with some of your other codes and search options (stemmed words). Some samples to try including: disaster, displace, lobby, activism, coral etc.
- Double click the copy of the file listed below the Text Search Criteria. The words in the search string are now highlighted within the context of the document
- To code the highlighted text, in the Text Search Query click Save Results. In the dialogue box that appears, select Create Results as New Code. Next to Location click the arrow, then select Codes

- Matrix coding queries
- Matrix coding queries enable you to see coding intersections between two lists of items. For example, let’s explore how our Impact codes intersect with countries
- First, create codes for each country represented in the sources and apply each of them to the related text
- Under the Explore tab, click Matrix Coding Query. Search in Files & Externals. Select, drag, and drop all of the Country child Codes into the Rows and drag and drop all of the Impact child themes codes into the Columns text boxes. Then select Run Query
- The resulting matrix shows counts of which impacts were raised by speakers from different countries
- To save the query, click the Save Results button. The results will be saved in the Queries folder in the navigation pane.


- Creating visualizations
- Visualizing Query Results: NVivo automatically creates visualizations for Queries. Re-open your saved Word Frequency Query. On the right-side of the results summary, a tab indicating Word Cloud is available

- Exporting materials
- Project Export: In the rop ribbon, under Share click the Export Project icon. In the dialogue box that appears, you can browse to select where to save the file
- Individual Item Export: You can also export the codebook and other content generated in NVivo as individual files. In the top ribbon, under Share click the Export icon and select Export Codebook. In the dialogue box that appears, select codes and browse to select where to save the file. You can choose to save the file as either in MS Word format (*.docx) or MS Excel (*.xlsx)
- Saving your workspace
- Your workspace is saved by NVivo as a *.nvpx file. All of your files and outputs are saved as part of your workspace. To save, click File above the top ribbon, then select save. If you need to copy your workspace to another location, select Copy Project under the Explore tab.